

I love any recipe that is easy AND delicious, and this recipe is both. The crust is crisp and chewy, and the bread is filled with slightly bitter dark chocolate, which the sweetness of the cherries complements perfectly. The richness of the chocolate makes this bread the perfect sweet bite, whether as breakfast or a treat at the end of your meal. And with just 6 ingredients, it is as easy as it is delicious. Enjoy!
Dark Chocolate Cherry No-Knead Bread
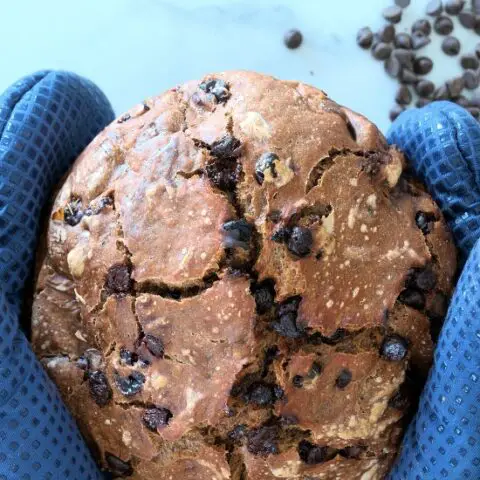
Gorgeous bread with a crispy crust and soft, moist interior. The hint of bitterness from the dark chocolate is offset by the sweetness from the cherries.
Ingredients
- 2 3/4 cups + 2 tablespoons all-purpose flour
- 2 tablespoons cocoa powder
- 1/4 teaspoon yeast
- 1 1/2 teaspoons salt
- 1 3/4 cups water
- 1 cup dried cherries
- 1 cup dark chocolate chips
Instructions
- Mix the flour, cocoa powder, yeast, salt, and water in a large bowl. Tightly cover with plastic wrap and let sit for 10-12 hours or overnight.
- Next, add the dark chocolate and dried cherries and mix thoroughly. The dough will be sticky and soft. Then cover again and let sit another 1 hour.
- While the dough is sitting, press a piece of parchment paper into the shape of your baking dish. You can use a 2.5-3 quart dutch oven or casserole dish as long as it is oven safe and has a lid. Remove the parchment paper and set it aside to use later.
- After the dough has rested 40 minutes, place your container (with the lid on) into the oven. Set to 425 degrees Fahrenheit. Let warm for the final 20 minutes of rising time.
- Carefully remove your baking dish from the oven. Put the parchment paper into the baking dish (be careful not to burn yourself as the dish is very hot), then place the dough into the baking dish.
- Cover with the lid and bake for 30 minutes. Uncover and bake for another 10 to 15 minutes to allow the top of the bread to brown.
- Once your bread is done, use the parchment paper to remove it from the dutch oven and allow it to cool on a cooling rack.
- Slice and serve.
Notes
This bread can easily be made vegan by using vegan chocolate chips
If you find the dark chocolate chips too bitter, semi-sweet, milk chocolate or a blend can be used.
Nutrition Information:
Yield: 12 Serving Size: 1Amount Per Serving: Calories: 129Total Fat: 5gSaturated Fat: 3gTrans Fat: 0gUnsaturated Fat: 2gCholesterol: 1mgSodium: 271mgCarbohydrates: 21gFiber: 2gSugar: 16gProtein: 1g
Nutrition information is an estimate only.
If you’d like another fabulous no-knead bread recipe, I love this white chocolate cranberry bread recipe.
Storage
Because this is artisan bread, it is best served within 1 to 2 days of baking; the fresher, the better. It tends to dry out if not eaten soon after baking. Store in an airtight container at room temperature. If freezing, wrap in plastic wrap, then place in a tightly sealed container. Artisan bread maintains quality 2-3 months after freezing. Check out this article on the best way to thaw bread.
Why Use a Dutch Oven for No Knead Bread?
No-knead bread is lovely because of its thick, crispy crust and chewy interior, filled with large air holes. The Dutch oven plays a vital role in giving no-knead bread its signature texture.
A Dutch oven works because the preheated empty Dutch oven functions like a steam-injected oven. Unlike when cooking regular bread, steam is trapped in the Dutch oven, which helps evenly distribute the heat. This steam keeps moisture in the crust longer so it takes longer to harden, allowing the bread to continue expanding and giving it its signature cracked crust.
The moisture in the crust from the steam gelatinizes starches on the crust of the bread. The starches then expand and become shiny, giving the bread its glossy crust. This moisture in the crust also keeps the crust cool longer, so the yeast stays alive longer. This enables the yeast to reduce starches in the flour to simple sugars. The sugar caramelizes, giving the bread its stiff, shiny crust.
If you made this recipe, I’d love to hear about it! Please leave a review or a comment letting me know how things turned out. Happy baking!


