

One of the traditions in my home growing up was my parents would make us a homemade breakfast, and we would all eat together every Saturday morning. As I got older, I enjoyed taking my turn making breakfast for everyone. This was definitely one of my favorite things to make as they are quite easy to make yet super delicious. If you’ve never heard of them, Buttons and Bowknots are spiced biscuits rolled in butter and sugar. They are the perfect choice for breakfast or brunch, especially alongside your hot beverage of choice. Enjoy!
Buttons and Bowknots From Scratch
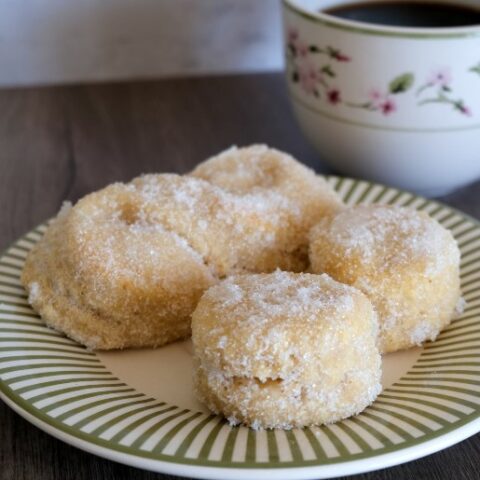
Sweet biscuits spiced with nutmeg and cinnamon all rolled in sugar. Perfect for breakfast or brunch alongside a mug of hot chocolate.
Ingredients
- 1 3/4 cup all-purpose flour
- 2 tablespoons granulated sugar
- 2 1/2 teaspoon baking powder
- 1 teaspoon nutmeg
- 1/8 teaspoon cinnamon
- 1/3 cup shortening (I use butter flavored shortening)
- 1 egg
- 1/2 cup milk
- 1/4 cup butter
- 1/2 cup granulated sugar
Instructions
- Preheat the oven to 400 degrees Fahrenheit. Place parchment paper or a silicone baking mat on a baking sheet and set aside.
- Combine the flour, 2 tablespoons sugar, baking powder, nutmeg, and cinnamon in a medium bowl.
- Cut in the shortening until fine crumbs form (I typically use a fork to do this).
- Stir in the egg and just enough milk for the dough to leave the sides of the bowl. Remove from the bowl and knead lightly 10 times, just enough to form the dough into a ball.
- Lightly flour your counter then roll the dough out 1/2" thick. Cut with a doughnut cutter or with a large (3 1/2") cutter and a small cutter (1 1/2") on the inside of the large circle. Remove the inside circle and place it on the baking sheet. Then take the outer ring of dough and twist it to form a "bowknot."
- Place the buttons and bowknots about 2" apart on the baking sheet then bake on the ungreased cooking sheet for 8 to 10 minutes or until just browned on the top.
- In a microwave-safe bowl, melt the butter. Then place the 1/2 cup sugar in another bowl. Roll each of the buttons and bowknots first in the melted butter and then in the sugar. Serve immediately.
Notes
I typically end up using the full 1/2 cup of milk but I live in a very dry climate. If you live in a more humid client, be careful not to add too much milk or your dough will be very wet and difficult to work with.
While there are other recipes that use biscuit mix to make buttons and bowknots I much prefer making them fully from scratch. It only adds a small amount of prep time and the overall flavor is much better.
Nutrition Information:
Yield: 4 Serving Size: 1Amount Per Serving: Calories: 612Total Fat: 31gSaturated Fat: 15gTrans Fat: 1gUnsaturated Fat: 14gCholesterol: 89mgSodium: 430mgCarbohydrates: 76gFiber: 2gSugar: 33gProtein: 8g
Nutrition information is an estimate only.
If you’re looking for another unique breakfast treat, check out my Rhubarb Sweet Roll recipe!
Storage
Buttons and Bowknots are best served fresh so that they retain their crispy crust and moist interior. They are okay the next day, but they do become rather dry. After baking, you can freeze them; let them cool, then wrap them in plastic wrap or aluminum foil. Then place them inside an airtight container or zip-top freezer bag. They last 1-2 months in the freezer this way.
To thaw in the oven: start by wrapping your buttons and bowknots in aluminum foil. Then bake in a 300° Fahrenheit oven for about 10 minutes until warmed through and slightly crispy.
To thaw in the microwave: start by wrapping your Buttons and Bowknots in a paper towel that is just barely damp (wet the paper towel, then wring out as much water as you can). Then microwave for 10-30 seconds until warmed through.
Once thawed, then roll in melted butter and granulated sugar and enjoy.
The dough can be frozen, unbaked. Layer the dough between waxed paper and store in the freezer for up to 3 months. Defrost dough and bake for 8-10 minutes. Then roll in melted butter and granulated sugar and serve.
Butter vs. Shortening in Biscuits
Butter or shortening is an age-old debate among bakers. Personally, I have used and had good results with both butter and shortening when making biscuits.
The Role of Fat in Making Biscuits
So let’s first talk about the role of fat in biscuits. Fat adds flavor and moisture to baked goods. Fat also prevents gluten development, giving your baked goods a crisp, crumbly texture. In biscuits, fat helps with leavening (rise). The small chunks of fat melt and leave tiny air pockets to help lift the dough and give the biscuit its unique texture. Butter also has water that evaporates, and the steam further lifts the biscuit, making it light and flaky.
So What is Different in Butter vs. Shortening
Butter can create a looser dough that is less cohesive. Butter is also more difficult to work with because it melts at a lower temperature, and is critical to avoid melting the butter when handling the dough. Butter does give the dough a slightly lighter, flakier texture and gives the biscuit its buttery flavor.
Shortening does make the dough a bit more cohesive. You do have to be careful, though, not to overwork the biscuit dough as it comes together. However, you do not have to worry about melting the fat when handling the dough due to shortening’s higher melting point. Shortening will also give the biscuit a slightly more crumbly texture.
Ultimately, butter or shortening comes down to personal preference. I have biscuit recipes that use butter and recipes that use shortening. For this recipe, I like shortening as the dough is easier to work with, and I don’t miss the butter flavor, given the biscuit is rolled in butter and sugar before serving.
If you made this recipe, I’d love to hear about it! Please leave a review or a comment letting me know how things turned out. Happy baking!


